Introduction to Air Ride Switch Boxes
Are you ready to elevate your Air Ride Switch Box Wiring Diagram? Installing an air ride switch box can transform the way your vehicle handles, providing a smoother and more comfortable experience. Whether you’re working on a custom build or enhancing your existing setup, understanding how to wire an air ride switch box is crucial. This guide will walk you through each step of the process, ensuring that you have all the knowledge and tools at your fingertips. Get ready to dive into the world of air suspension systems and unlock the full potential of your vehicle!
Understanding the Wiring Diagram
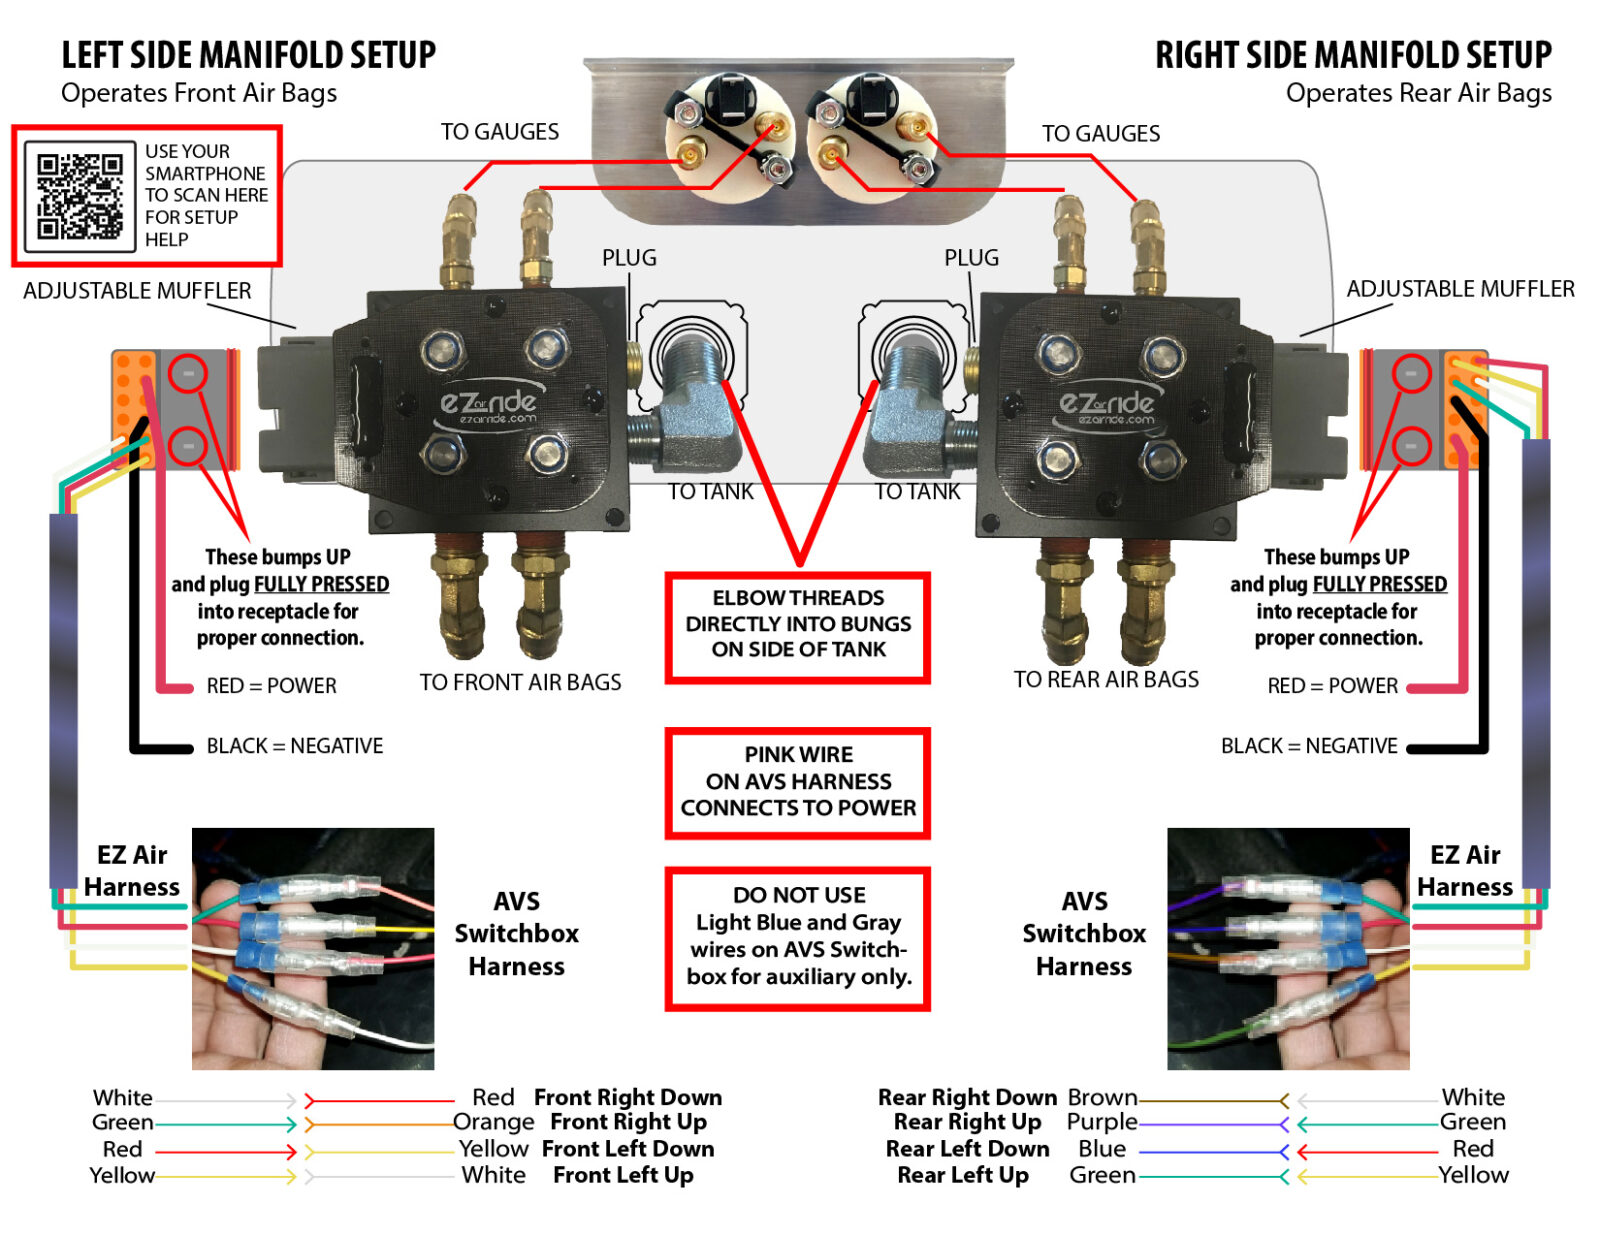
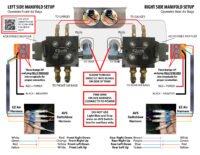
Understanding the wiring diagram is crucial when it comes to installing an air ride switch box. This visual representation serves as your roadmap, guiding you through each connection.
The diagram typically includes color-coded wires and labels for every component. Familiarizing yourself with these elements can simplify the installation process significantly.
Pay attention to key parts like power sources, switches, and sensors. Knowing where they fit into the overall system will help you avoid confusion later on.
It’s also important to note any specific wiring patterns or sequences required by your particular model. Following these guidelines ensures that everything operates smoothly once installed.
Don’t hesitate to have a reference image handy while working on your setup. A clear view of the wiring schematic can make all the difference in achieving a successful installation without hitches.
Tools and Materials Needed
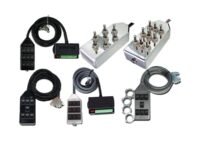
When preparing for your air ride switch box installation, gathering the right tools and materials is essential. Start with basic hand tools like a screwdriver set, pliers, and wire strippers. These will help you tackle any wiring adjustments that arise during the process.
Next, ensure you have electrical tape to secure connections. This helps prevent short circuits and keeps everything tidy. A multimeter can also be invaluable for checking voltage levels before making connections.
Don’t forget heat shrink tubing or connectors to protect your wires from moisture and wear over time. If you’re installing in an area prone to dampness, these added layers of protection are crucial.
Keep your workspace organized by using a small bin or tray for screws and small parts. This simple step saves frustration later on when searching for misplaced items amid the project chaos.
Step-by-Step Installation Guide
Begin by disconnecting your vehicle’s battery. This step is crucial to ensure safety while working on the electrical components.
Next, locate a suitable area for mounting the air ride switch box. Choose a spot that’s easily accessible yet discreet.
Once you have selected the location, use your wiring diagram as a guide. Connect the power wire from the switch box to your vehicle’s fuse panel or direct power source.
Then, attach ground wires securely to avoid shorts and interference. Ensure all connections are tight and insulated with electrical tape.
Proceed to connect the control lines from each height sensor or valve manifold according to your diagram. Pay close attention to color codes and labels on both ends of each wire.
After double-checking all connections, reattach your battery terminals. Test functionality before closing everything up completely.
Troubleshooting Common Issues
When dealing with air ride switch boxes, you might encounter a few common issues. One frequent problem is the loss of air pressure. Check for leaks in the system, including hoses and fittings. A simple visual inspection can sometimes reveal the source.
Another issue could be erratic operation of the switches. If your ride height fluctuates unexpectedly, ensure that all electrical connections are secure and free from corrosion. Loose wires can lead to inconsistent performance.
If you notice that certain functions aren’t responding at all, test each switch individually. This will help identify if a specific switch has failed or if there’s an underlying wiring issue.
Always keep an eye on your compressor too; it should run smoothly without excessive noise or overheating signs. If it’s struggling to fill up the system, it may need replacement or maintenance attention soon.
Safety Tips for Installing Air Ride Switch Boxes
When installing an air ride switch box, safety should always be your top priority. Start by wearing appropriate protective gear, including gloves and goggles. This will shield you from any tiny components or sharp edges while working.
Make sure to disconnect the battery before you begin wiring. This step prevents accidental shorts that could lead to damage or injury.
Work in a well-ventilated area if you’re using any adhesives or sealants during installation. Fumes can be harmful when inhaled.
Keep your work area organized and free of clutter. A tidy workspace reduces the risk of accidents.
If you’re unsure about any part of the installation, consult the manufacturer’s manual for specific guidelines related to your model. Don’t hesitate to seek professional help if needed; it’s better to ask than risk making a costly mistake.
Conclusion
When it comes to the installation of an air ride switch box, having a clear understanding of the wiring diagram is crucial. This guide has provided essential insights into each step of the process.
Remember that proper tools and materials are your best allies during installation. Following our detailed steps ensures you can set up your system effectively and safely.
If issues arise, troubleshooting tips can help identify common problems quickly. Always prioritize safety while working on any vehicle modifications.
With careful attention to detail and adherence to this guide, you’ll achieve a successful installation that enhances your driving experience with adjustable ride height capabilities. Enjoy the journey ahead with your newly installed air ride system!


Leave a comment